
Does your back feel stiff, sore, or just plain tired after sitting all day? You’re not the only one.
Whether it’s from hunching over a laptop, slouching on the couch, or being glued to your phone, your back takes more stress than you think.
The good news is, you don’t need a gym or fancy equipment to fix it. You can build a stronger, healthier back right at home using just your bodyweight. These moves are easy to follow, beginner-friendly, and don’t require anything except a little floor space.
In this guide, you’ll get 7 bodyweight back workouts with clear instructions, helpful form tips, and a short workout plan you can start today. No fluff, no guesswork, just what your back needs to feel better and function better.
Scroll down to start now, or save this for later when your posture needs a reset.
Why Your Back Needs Its Own Workout

It’s easy to forget about your back when you’re just starting to work out. Most people focus on abs, arms, or legs. But here’s the thing, though. Your back matters just as much if not more. A strong back helps your whole body work better.
First, proper back workout helps fix poor posture. (which is something almost everyone deals with)
Slouching over a screen or sitting with rounded shoulders can make you feel stiff, achy, or even tired. Strengthening the muscles in your upper and lower back helps you sit and stand straighter, with less effort.
Second, training your back reduces pain, especially the kind that creeps in from sitting too long or looking down at your phone all day. When your back muscles are weak, they can’t support your spine well.
That’s when strain builds up.
Third, building a strong back can make you look taller and more confident. You naturally carry yourself better when your muscles know how to hold you upright.
And finally, your back supports almost every other kind of movement, from squats workout and lunges to push-ups and even daily things like lifting a grocery bag or picking something off the floor. You need it in almost everything you do.
So if you’ve been skipping back workouts, now’s the time to change that.
Now let’s get into the actual moves you can do.
7 Bodyweight Back Workouts for Beginners
You don’t need a gym to train your back. These seven bodyweight exercises can be done right at home with minimal space and zero equipment (okay, one uses a backpack, but that’s it).
Each move targets a different part of your back and helps improve posture, strength, and stability.
Do them on their own or include them in a full routine (we’ll show you how in the next section). For now, take your time learning each one. Focus on slow, controlled movement and good form.
1. Reverse Snow Angels
What it works: Upper back, especially the muscles around your shoulders
How to do it:
Lie face down on the floor with your arms stretched straight overhead and your legs extended. Lift your arms, chest, and legs just slightly off the ground. Then slowly sweep your arms out to the sides and down toward your hips like you’re making a snow angel, but in reverse. Keep everything off the ground if you can.
Form tip: Don’t shrug your shoulders up toward your ears. Keep your neck long and relaxed the whole time.
2. Superman Hold
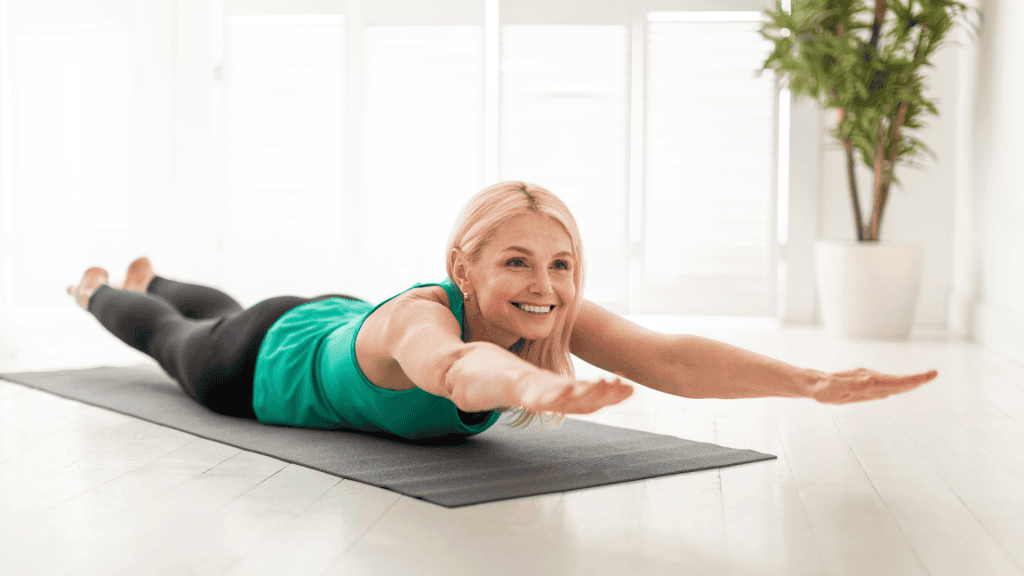
What it works: Lower back and glutes
How to do it:
Lie flat on your stomach. Reach your arms forward and extend your legs back. At the same time, lift your chest, arms, and legs off the ground and hold that position. Aim to hold for 20 to 30 seconds, then rest.
Form tip: Keep your eyes looking down to avoid straining your neck. Don’t over-arch—lift gently, not forcefully.
3. Glute Bridge with Arm Reach
What it works: Glutes, lower back, and upper back stabilizers
How to do it:
Lie on your back with your knees bent and feet flat on the floor. Lift your hips into a glute bridge. Once you’re stable, reach one arm straight up toward the ceiling and hold for 2 seconds, then switch arms. Alternate slowly, staying in the bridge position the whole time.
Form tip: Keep your hips level, don’t let one side drop when you reach. Squeeze your glutes throughout the entire move.
4. Quadruped Arm and Leg Reach (Bird Dog)
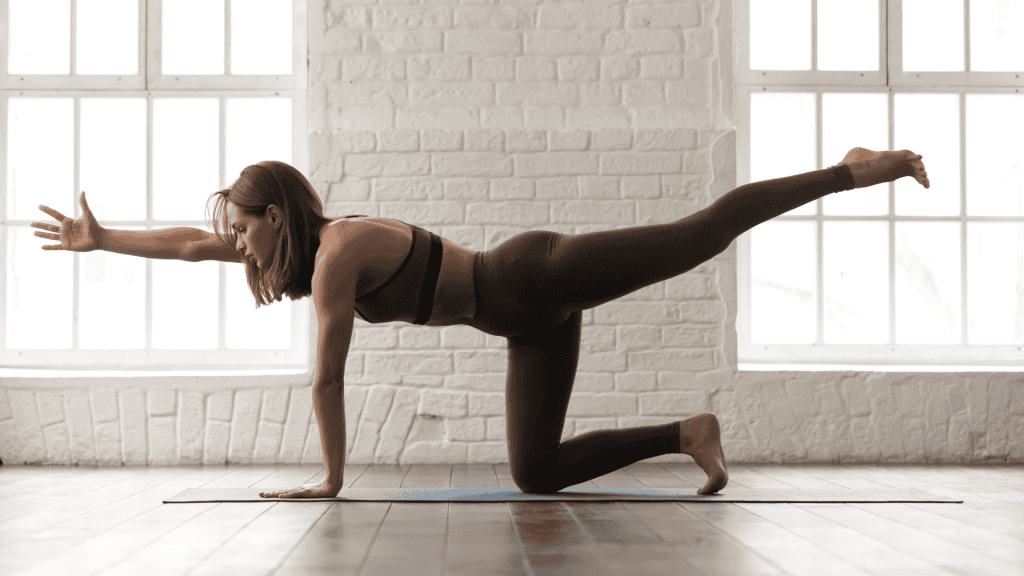
What it works: Mid-back, core, and postural muscles
How to do it:
Start on your hands and knees. Extend your right arm forward and your left leg straight back at the same time. Keep your hips and shoulders level. Hold for a moment, then return to the start. Alternate sides.
Form tip: Move slowly. Avoid shifting your weight side to side. Imagine balancing a glass of water on your back.
5. Wall Slides
What it works: Upper back, shoulders, and posture control
How to do it:
Stand with your back against a wall, feet a few inches out. Press your lower back, upper back, and head into the wall. Raise your arms into a goalpost position (elbows bent at 90 degrees). Slide your arms up the wall, then back down.
Form tip: Keep your arms and wrists touching the wall as much as possible. Don’t let your lower back arch off the wall.
6. Backpack Rows

What it works: Upper back and lats
How to do it:
Grab a backpack and load it with a few books or water bottles. Stand with your feet hip-width apart and hinge slightly at the hips. Hold the bag in both hands and let it hang down. Pull the bag toward your chest by driving your elbows back, then lower slowly.
Form tip: Don’t round your back. Keep your spine neutral and squeeze your shoulder blades together at the top.
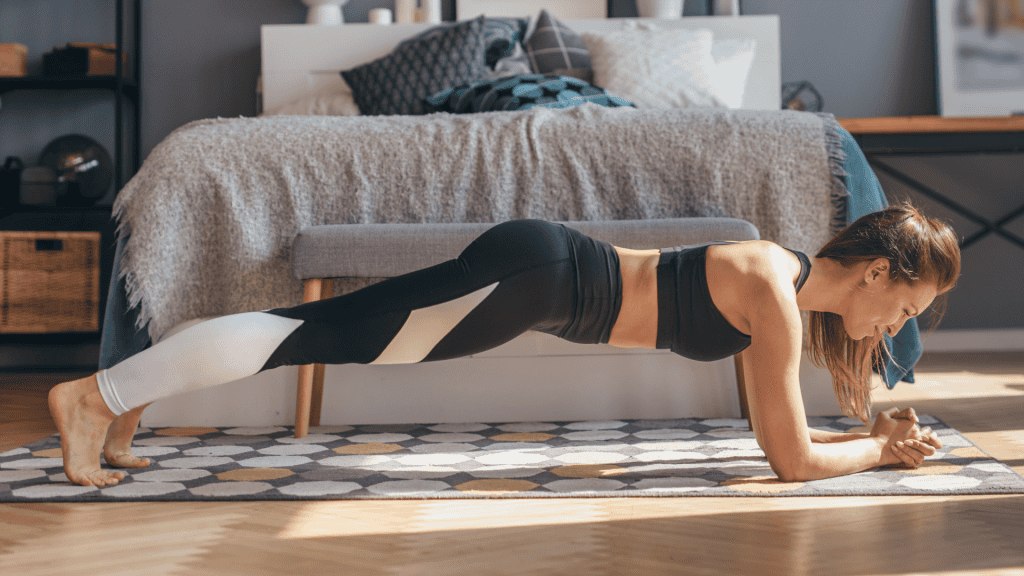
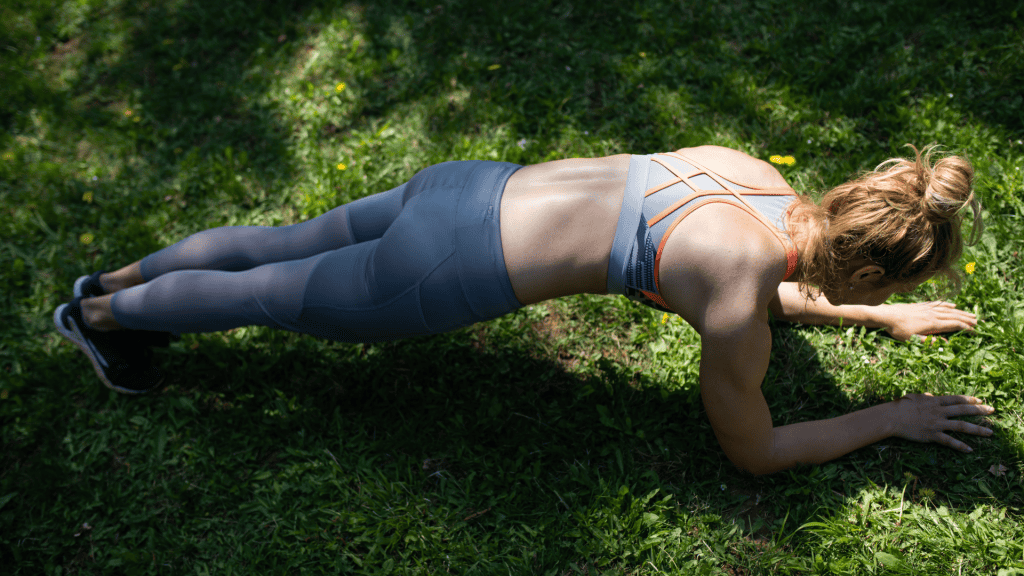
7. Forearm Plank with Shoulder Taps

What it works: Upper back, shoulders, and core
How to do it:
Start in a forearm plank elbows under shoulders, body in a straight line. Shift your weight slightly and tap one shoulder with the opposite hand, then switch. Keep your hips steady.
Form tip: Move slowly and don’t let your hips sway. Keep your belly pulled in the whole time.
These seven moves are simple but effective. Start by practicing each one for about 30 seconds, then rest. As you get stronger, you’ll be able to turn them into a full workout.
15-Minute Bodyweight Back Workout Plan
Now that you’ve learned the exercises, it’s time to put them into a repeatable workout plan.
This circuit is designed to be quick, effective, and easy to stick with no matter your schedule or fitness level. You don’t need any special equipment, but a yoga mat or soft surface can make things more comfortable.
Here’s how it works:
- Do this routine 2 to 3 times per week on non-consecutive days (for example: Monday, Wednesday, Friday).
- Complete 2 to 3 full rounds of all 7 exercises listed below.
- For each move, work for 30 to 45 seconds, then rest for 15 to 20 seconds before moving on.
- After each round, take a 60-second break before starting the next.
You can use a timer app to help you stay on track, or print out a simple checklist to keep things organized as you go.
Here’s what a single round looks like:
- Reverse Snow Angels – 30 to 45 sec
- Superman Hold – Hold for 30 sec
- Glute Bridge with Arm Reach – 30 to 45 sec
- Bird Dog (Quadruped Reach) – 30 to 45 sec (switch sides each rep)
- Wall Slides – 30 to 45 sec
- Backpack Rows – 30 to 45 sec
- Forearm Plank with Shoulder Taps – 30 to 45 sec
Once finished, rest for one minute, then repeat the circuit. If you’re a beginner, start with two rounds. But as you get stronger, you can definitely move up to three.
Start with 2 rounds and work your way up. Keep it short, but steady. What matters most is that you move with purpose and maintain good form.
Don’t rush, just keep focus on feeling the right muscles working with each move.
Build a Back-Strong Habit
It’s not just about doing one workout; it’s about building a routine you can actually stick to. A strong back takes consistency, but that doesn’t mean training every day.
Your muscles need time to recover so they can get stronger between sessions.
This weekly plan gives you structure without being overwhelming. It includes strength training, light movement, recovery, and rest, all key parts of making progress that lasts.
Monday, Wednesday, and Friday – Back Circuit
On Monday, Wednesday, and Friday, these are your main training days focused on the Back Circuit.
Each day, follow the full-body back workout outlined in the previous section. Starting with two or three rounds is sufficient. Remember, prioritize proper form over speed during each exercise.
Tuesday and Thursday – Light Movement
On Tuesday and Thursday, focus on Light Movement days.
Use these days to keep your body active without overworking your muscles. Consider going for a short walk, doing some stretching, or engaging in light core exercises such as bridges or bird dogs.
The aim is to maintain movement without exerting too much strain on your body.
Saturday – Optional Full-Body Stretch or Yoga
On Saturday, consider an Optional Full-Body Stretch or Yoga session.
If you’re feeling good and looking to add a little extra, opt for a gentle full-body stretch or a beginner-friendly yoga flow.
These activities can enhance flexibility and alleviate any soreness, particularly beneficial if you’ve spent a lot of time sitting during the week.
Sunday – Total Rest
Rest is just as important as exercise. On Sundays, take the day off from structured movement. Relax, hydrate, and let your body recover. You’ll come back stronger on Monday.
A weekly plan like this keeps your routine balanced and helps prevent burnout. The key is to make movement a normal part of your week, not something you fear or skip when things get busy.
Quick Tips to See (and Feel) Results
Getting started is a win in itself. But if you want your back to feel stronger and your posture to improve, it’s important to pay attention to the way you move, not just how often you move.
These tips are simple to follow but can lead to noticeable changes in how your body looks and functions, especially if you sit a lot or are just getting back into working out.
1. Focus on form, not speed
Your goal isn’t to race through the workout; it’s to move with control and use the right muscles.
For example, during backpack rows, if you swing the weight up using momentum, your back isn’t doing the work.
But when you slow down and squeeze your shoulder blades together at the top, that’s when you actually train your back.
Move slowly enough that you can feel the muscle working. (That’s how progress happens)
2. Don’t skip the warm-up
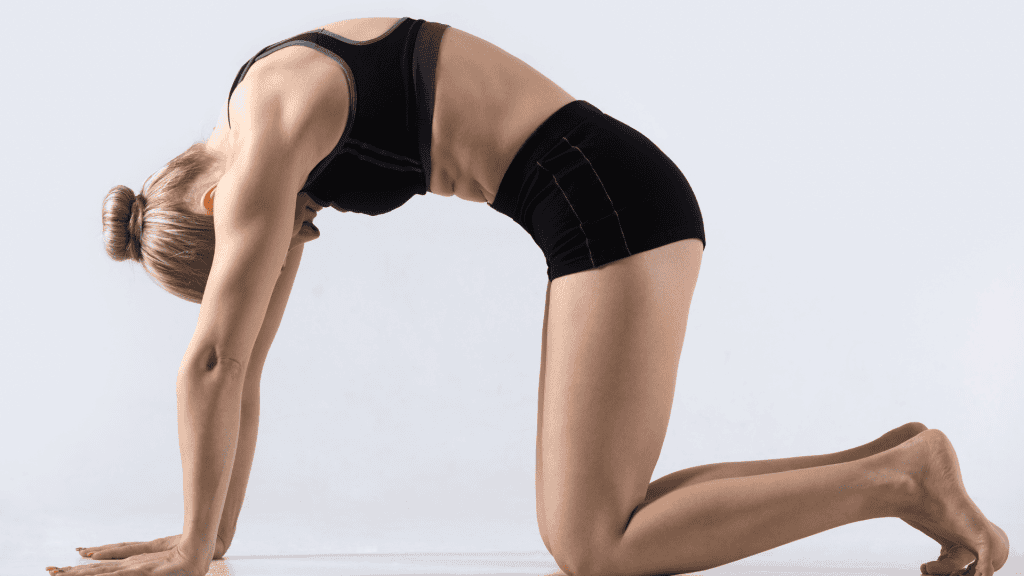
Even if the workout feels short, your body still needs time to get ready. Take at least 2 to 3 minutes before you start to warm up your shoulders, spine, and hips.
You can do basic moves like arm swings, shoulder rolls, or cat-cows.
These get your blood flowing and your joints moving more freely, which helps prevent stiffness and strain once the workout begins.
Example warm-up:
- 30 seconds of arm swings (forward and back)
- 30 seconds of shoulder circles
- 5 slow cat-cow stretches
- 10 wall slides or standing reach-overs
It doesn’t have to be long, it just has to happen.
3. Breathe during every movement
A lot of beginners hold their breath without realizing it, especially during hard moves like planks or superman holds. This makes the exercise feel harder and can actually make your muscles fatigue faster.
A simple rule: exhale during the hardest part of the move (like when you lift or row) and inhale when you return to start.
Example:
- In a glute bridge with arm reach, inhale as you lower your hips, and exhale as you lift and reach your arm.
Breathing helps you stay focused, calm, and in control.
4. If you sit a lot, do one or two of these exercises daily
Even just 5 minutes of movement can help undo some of the tightness and weakness caused by sitting. Try to do a couple of back-focused exercises once or twice throughout the day.
You don’t need to change clothes or break a sweat, just move your body.
Example daily mini-routine (2–3 minutes):
- 10 wall slides
- 10 bird dogs per side
- 15–20 seconds of a forearm plank
These short movement breaks can help reduce that mid-day slump and improve your posture when you go back to your desk.
5. Take before-and-after posture photos (yes, really)
It’s hard to notice subtle changes when you look at yourself every day. That’s why taking a posture photo at the beginning of your routine is so helpful.
Stand sideways in front of a mirror or plain wall, relax your body, and take a photo without flexing or adjusting. Repeat the photo after 3–4 weeks of consistent training.
You might notice your shoulders sit further back, your head isn’t jutting forward, and your spine looks more aligned. These are all signs your back is getting stronger and supporting you better.
Sticking with these small but important habits will help you see real, lasting results whether your goal is less pain, better posture, or simply feeling stronger and more stable in your day-to-day life.
You Don’t Need a Gym to Build a Stronger Back
You just learned how to train your back at home with no weights, no machines, and no fancy setup required.
With consistent practice, these bodyweight exercises can help you improve posture, reduce stiffness, and feel stronger in your everyday life.
When your back is stronger, everything feels easier. You sit taller, move better, and carry yourself with more confidence. This isn’t just about fitness, it’s about feeling good in your own body.
If you showed up and made it through even one round of the workout, that’s progress. Don’t wait for a “perfect week” or the “right time” to get started.
Showing up and doing what you can even on busy or low-energy days is what creates real change over time.
If this guide helped you, consider sharing it with a friend who also wants to feel better and move more. You can also save it, bookmark it, or print it out to use throughout the week.
Try the full routine for one week, then see how your body feels.
(Chances are, you’ll stand a little taller and feel it too)
Build a Stronger Back from Home
 (62)")
Your back deserves more than random workouts that never add up. A clear plan helps you see real progress week after week.
The Free Weekly Workout Schedule does exactly that—mapping out when to train, when to rest, and how to keep your body balanced without extra equipment.
Instead of piecing things together on your own, you’ll have a weekly framework that turns these back exercises into a consistent routine you can stick with.
Frequently Ask Questions
1. Can I really build a stronger back without weights?
Yes, you can. Your bodyweight is often enough especially if you’re just getting started. Moves like reverse snow angels, bird dogs, and planks build strength in the muscles that support your spine, shoulders, and upper back. As long as you’re using proper form and adding challenges over time (longer holds, slower reps, more rounds), your back will get stronger.
2. Is this good for posture or just strength?
It helps both. Most of these exercises improve the muscles that control your posture like the ones between your shoulder blades and along your spine. When those muscles are stronger, it’s easier to sit and stand tall without feeling tired or tense. So yes, you’re building strength and better posture at the same time.
3. Will this help with back pain from sitting?
In many cases, yes. If your back feels sore or stiff after sitting all day, these movements can help relieve that tension and strengthen the muscles that support your spine. That said, if you’re dealing with sharp or chronic pain, check with a healthcare provider before starting any new routine.
4. Do I need to work my back if I already do squats?
Yes, absolutely. Squats are great for your legs and glutes, but they don’t directly train your upper or mid-back. If you skip back exercises, you miss out on key muscles that keep your shoulders stable and your spine supported. Think of your back as the foundation that helps everything else stay in balance.
5. How long before I notice a difference?
You might feel the difference within a week or two especially if your back was weak or tight before you started. You may notice less stiffness, better posture, or even more comfort while sitting. Visible changes, like more definition or better alignment, usually take a few weeks of consistent work, depending on your routine and how often you train.


